Wednesday, September 1, 2010

*Garage Storage Solution*

2 February 2010

I saw this idea on the web and thought I'd copy it as a great "someday" project.

If you are like my family, we are constantly short on space in our house. Rather than buy a huge McMansion, we bought what we could afford and ended up with a ranch house with about 2000 square feet. While this is big compared to previous generations, it seems ours has more “stuff”. We have been working at cleaning out junk and freeing up space but we are still coming up short and everything seems cluttered. This seems even more so with our acquisition of more and more preparedness materials. In order to help alleviate the constant storage issue, I decided it was time to build overhead garage storage. I wanted a place where I could store items while I work on securing “tickets” for my family. I also want those items all together and easily accessible. My preference is to have some boxes which would easily load and stack on my 5’x8’ utility trailer and be strong enough to hang from the ceiling.

After searching around at various stores, including WalMart and Target, I found exactly what I was looking for at Lowes.

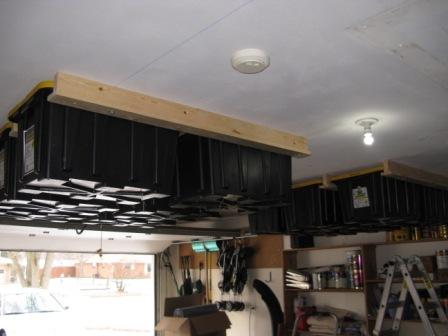
These totes are just under 30 inches long with allows me to place two rows in the trailer and hang them in rows of two on the ceiling. They are made to hold 400 pounds, not that I will ever put that much in them, but I know they are solid. This helps though when stacking them. I can comfortable stack two to three without worrying about the bottom tote having its sides bow out. They also have a solid lip around the top for hanging them like I wanted to do. Finally the tops have small holes on the edges where they can be secured with zip ties to ensure they stay shut.

    For what I did here are the materials needed.
  • 12 of the above totes $11.67 each (Lowes)
  • 4 – 1x4x10 boards $2.91 each (Lowes)
  • 4 – 2x4x10 $3.69 each (84 Lumber)
  • 16 – 3/8x8 lag screws $1.89 each (84 Lumber)
  • 16 – 3/8 washers $1.04 per bag needed 4 bags (Lowes)
  • 40 – 4” deck screws $8.99 for one box (Lowes)
  • Total cost $209.95

Lowes did not have 1x4x10 but they had 1x4x8. I thought about purchasing the 8 foot lengths but thought I would end up with waste and end up spending more in the end. I went to 84 Lumber and they had the 10 foot lengths. I also purchased the lag screws at Lowes at $3.00 each, but when I went to 84 Lumber they were $1.89 there so I purchased them again and returned the ones I bought at Lowes.

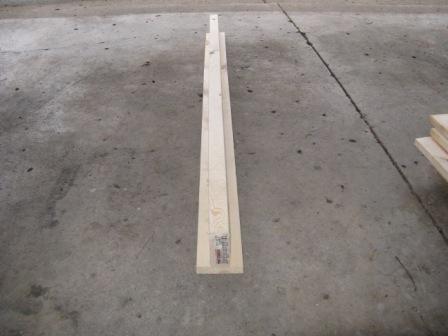
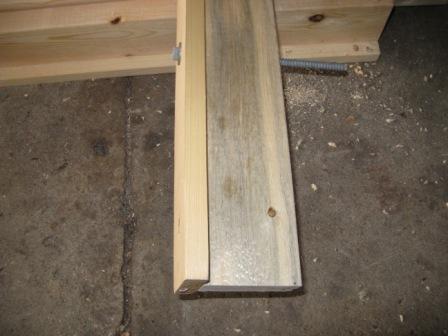
The first step is to cut the 1x4s and 2x4s in half. This provided enough room to support two totes with an inch to spare. Once all the boards are cut, I stood the 2x4x5s on the 2” side and put gorilla glue on the up side. Then I laid a 1x4x5 on top of the board and secured the ends with clamps. I then started putting the deck screws into the boards from the 1x4x5 into the 2x4x5. I spaced the screws 1’ apart. Repeat this for all of them. I ended up with 8 of the combined boards.

*In my first attempt I left the boards uncut in their 10’ lengths. I found this unwieldy and difficult to cut with my miter saw.

The next step is to prepare the ceiling of the garage. The joists in my garage were 24” apart. Rather than measure out everything before hand and end up missing or messing up something, I started with one side and moved from there once I had the first boards secured.

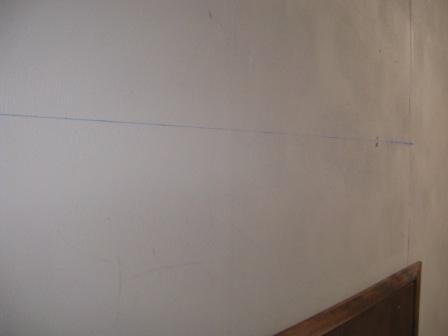
To make find the center of the joist I measured to where I thought it should be and marked it. I then took a small hammer and penny nails to find the exact center. I did this where I wanted to start and then I repeated this step well past where I thought where the boards would hang. I then had my wife help me put a chalk line on the ceiling to help me keep the boards straight.

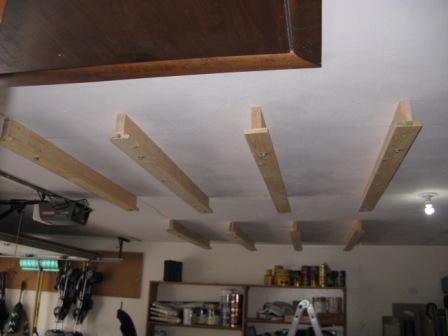
To put the boards up, I measured where the boards would cross the joists. Each board crossed the joist 3 times. I placed them so they would cross near the ends and again in the middle. I drilled a pilot hole into the joist with a 1/4” bit. I measured several times and made sure the holes I drilled into the boards lined up exactly. I marked the boards with a marker and drilled a hole into the boards with a 3/8” bit. I then put washers on the lag screws and pushed them through the holes in the board and put them up to the ceiling to ensure they lined up. Measuring multiple times helps to prevent mistakes here.

I put a few of these up by myself, but it is much easier to have some help here. I secured one end into the joist enough where it could hold itself for a minute and then climbed my second ladder to secure the second side. Getting the lag screws into the ceiling took some work at first. The head of the lag screw was 9/16. My 9/16 socket had a small ratchet and I could not get leverage. I took a 3’ piece of pipe and added it to the handle and things when much easier from there.

After putting the first one up I needed to make sure I had room to slide the tote between the boards. I measured along the chalk line 21” from the boards I just secured to the ceiling. This helped keep the spacing right and kept me from drifting. I then measured 21” from the second lag screw and marked. This mark was usually off a little and I had to measure to find the joist. Again, lots of measuring helps keep everything straight.

Once the measuring is done I repeated drilling and securing the boards to the ceiling. After every time I added new boards I put an empty tote up there to make sure I had the proper spacing.

These boards are pretty secure into the joists. I have some of the boxes up in the ceiling now holding about 45 pounds each. To test them, I hung off of them with all of my 220 pounds and they did not budge.

I am not that “handy” but I like to try to do stuff around the house and think through the problems. In the end I am very happy with how the project turned out. The total time I spent was about 5 hours. If I had consistent help, I think I could have cut it down to 2-3 hours. A lot of my time was lost climbing up and down my two ladders making sure I measured right.

Over the next few weeks as I fill everything I will put labels on the bottom and side of the totes to tell me what is in the boxes.

Monday, August 9, 2010

For ease of networking, I installed Windows Vista on bonus room computer. I saved an image on Maxtor External, which really came in handy as hard drive was corrupted when I hooked up second SATA drive. Will run that machine with only 700GB drive installed. I could not get DVRMS Toolbox to work, so went with HandBrake, though that does not scrub commercials.

Got Garage cleaned up to the point where I could put the Porsche in it yesterday. Maybe two cars by the end of the week.

Sunday, July 25, 2010

Moving into Yorktown

Well, it 25 July 2010, and we've been here 8 days. Most of the boxes are out of the inside of the house, and we have a ton of empty boxes in the garage, which the movers should pickup this week. Networking is working, cable working. Kids seem comfortable in their rooms. Takes a lot of effort, but we are making progress.

Sunday, June 20, 2010

Camaro Work

I am losing water from the cooling system on the Camaro, but I'm able to quantify it to about 1/2 gallon for every three tanks of gas. I'm pretty sure it is a head gasket leak.This could also be cause of "knocking" noise I have on some startups. But I've decided to drive the wheels off the Camaro, so fixing some things:
  1. Repaired air conditioning. NEX autoport did the work. They charged about $350 less at $650 than Goodyear was estimating.
  2. Oil change while repairing AC.
  3. Oil pressure sensor leaked right after oil change. It is right above the oil filter. Coincidence? Eh. Hardest part of the repair was not having right wrench to screw it on with.
  4. Turn signal relay. Right turns would sometimes just come on solid and not blink. Seems to be working.
  5. High beam dimmer switch. I bought a replacement, but it is not broken, just sometimes hard to get to switch. The switch is in a very difficult to get at location, so I think I'll let it be for now.
  6. Started some work on rust around the battery. I need to remove the plastic base, but I do not have the tools with me to do it. Put some Rustoleum Rust Converter on the rusted areas. We'll see how that goes.

Saturday, June 12, 2010

VNCs revisited

TightVNC is the program. Seems to be working well, and the ability to access with a simple web browser (with Java) makes it easy. Shirlee set up a recording while watching TV today... That's my definition of success.

Put Gateway Laptop back on XP

Tired of my Gateway computer waking up, not shutting down, and emptying the battery. So I'm shifting to XP. Restored last XP image, updated, reimaged. Seems to running well.

Painted Jennifer's room...

Last night painted Jennifer's room to cover up the remnants of putty for pictures on walls. Sanding, followed by a bit of drywall mud. Edger, and roller - looks as good as new. Very pleased with how it worked out.

New tires yesterday...

Four new tires for the Camaro. "Falken" brand tires, $114 each. Goodyear says I need new front end bearings and tie rods, and as they looked at the air conditioning as well, my compressor needs replacement. $1000 too much to spend right now, at least until I make up my mind as to whether or not fix the head gasket leak as well.

Thursday, June 10, 2010

Tires

Goodyear no longer makes tires for a 13 year old Chevrolet Camaro. If that is not a sign of the apocalypse, I don't know what is.

Which is probably the case. I will get "Falken" tires instead, and the AC recharged. I'm pretty sure I have a head gasket leak, but I'm willing to live with it for now.

Wednesday, June 2, 2010

Roombas Revisited

Battery charging for long period of time (48 hours) seems to have worked. Each battery ran the Roomba for about an hour yesterday. And it really does a reasonable job when it runs for that long.

CamelBak Bladders

Facts about CamelBak Bladders:
  1. Your wife will ridicule you for hours about calling them bladders. And this is probably appropriate.
  2. You CANNOT dry them out by microwaving them for a short time in the hope of vaporizing the water. Turns out the plastic is pretty heat sensitive. Don't ask me how I know this.
  3. Using a paper towel to absorb the last remaining water is the best trick I know for drying them out and storing them.

Monday, May 31, 2010

Virtual Network Clients and other high risk behaviors

I've always wanted to be able to control my multimedia computer by a VNC. I finally succeed, though I'm not quite where I want to be yet. But here are the basic steps.
  1. I installed TightVNC server on the Windows Vista 64 Bit computer we use as our media center.
  2. I installed xtightvncviewer on my Mini. Ubuntu told me it was not installed at first, and then told me how to get it. How cool is that?
  3. I set the passwords on the TightVNC server, both for admin and for access.
  4. I started xtightvncviewer on the Mini, typed in the IP address given by TightVNC on the Vista machine, followed it with a password, and voila, remote access.
I'll admit, I'm excited as all get out about this, though not really for me. I expect that when I show my wife that she can adjust Media Center recordings, start conversion of recorded TV to iPod format from her computer without turning on the TV and going through the machinations of our surround sound system selection of computer input (including whether sound will work without a reset of computer or cycling power to TV), that she will be overcome with joy. Or at least will stop beating me so much (again, I kid, I kid!).

I'm not quite happy with the setup though. I feel relatively secure in that if I understand routers correctly none of this is actually leaving my router, as both machines connect there. But regardless, I'm going to try a ssh approach to tunnel the VNC on. I'll keep you posted on how that goes. But the above works. And works surprisingly well.

Shutdowns, Hibernates, and Suspends

Okay, so I've talked a bit about how I love the Mini with Ubuntu. In the "full transparency" mode, I'll tell you where I don't think things have changed much.

Shutdowns, and reboots are comparable, and quite frankly unless I have to do them often I really don't care. I suspend or hibernate almost exclusively. To the point that I'm not even shutting down and restarting now to experiment. So there. Besides, I didn't time Windows XP. I believe Ubuntu boot times are a bit shorter than the XP boot times. Hows that for your objective scientific method?

Suspends are faster in Ubuntu. 9 seconds to suspend (though I really don't care about that other than as wasted battery life) and 6 seconds to login when restoring. Much better performance the XP. And don't get me started on Vista's phantom wakeups from suspends that result in low battery hibernations that don't complete properly. Meh.

Hibernates take 64 seconds to shutdown, 42 seconds to restart. I fundamentally think that is driven by the memory and architecture of the Mini vice any real difference in the operating systems.

I tailor my power preferences to hibernate when I'm closing the lid (I'm going outside the house so go to lowest power state to stay at max charge), and to suspend with the power button (in home, probably are hooked to charger or have access to it so fast response is more important).

Which Ubunutu for HP Mini - UNR or Standard?

This one took me exactly one day to decide. I have the 16 GB SSD based version of the HP Mini. I originally put Ubuntu Netbook Remix (UNR) onto it, but one of the things I've always coveted about Linux was the idea of "workspaces", and with a small screen that seems even more useful. UNR didn't have it (at least out of the box), and the standard install did. I put the standard install on and haven't looked back.

Two hardware issues had to be resolved:
  1. The wireless drivers had to be updated. Because they are not "free and open source" they don't come with the install, but Ubuntu will actually prompt you to install them. To installs with the ethernet lan connected, one machine reset, and voila - Wireless connectivity with WPA2 encryption. I love it when stuff just works.
  2. Internal microphone for use with Skype / sound recording. This one took some digging, but was easy once I found the answer.On the speaker think on the top tool bar, select sound preferences, and "Line in/Line in" as the source. Then open a terminal window (CTRL ALT T) and start alsamixer. Hit TAB to go to second page and crank up Capture volume. You'll can tell your on the right track with the "Line in/Line In" as if you tap the speaker, you get the taps, but not enough gain to hear your voice. I tested with Skype echo call and got good results once both the abover were done.
I've done a number of tweaks to get the best (for me) out of the Mini. I made both top and bottom toolbars "Autohide". This actually seems to work in Ubuntu. Vista used to drive me absolutely bonkers with this performance detail. I never could wrap my mind around how the decision to auto hide was being executed. In Ubuntu, it works just the way I think it should... the bar is freakin' hidden until I mouse down to it. Simple. I'd better stop or I'll start poaching into another post about simplicity versus complexity and reliability. That's another entry.

I've always wanted to love Linux...

I've always wanted to love Linux, but each time I've installed it I've gotten annoyed enough that I decided that it just was not ready for prime time. Now, a couple of parametric changes occurred:
  1. I work in the Navy in a secure building, and no longer are Personel Electronic Devices (PEDs) allowed. This includes cell phones, and in my case, a iPaq Pocket PC that I used to keep synchronized with all my Outlook notes. This ability was a key part of what Linux didn't do for me. Now that is requirement is gone. The loss in personal productivity associated with that is meat for another post.
  2. Windows installs are big and bloated. I don't mean that in a bad way, but if you are using windows, those jeans DO make you look fat. I have one of the HP Mini 1000 netbooks and with windows it just bloats up. Now that the Mini's hardware is working with Ubuntu, I was ready to give it a try.
  3. Ubuntu at 10.04 has a suite of programs which is just as comfortable as their Microsoft counterparts. There is not a good spider solitaire on it, so that's another 6 hours of my life a week I'll get back. I kid, I kid!
  4. I loaded Microsoft Office 2010 beta a while back. I don't like it as much as 2007, and I think it is because the programs are becoming to layered and complex. I don't think it is an "upgrade".
Okay, so bottom line is, I'm typing this blog entry on a Ubuntu Lucid Lync based HP Mini with Firefox browser, and I'm happy as all get out with the responsiveness and speed. My recommendation is that if you needed a reason to love Linux, you may actually have it now with this distribution.

Roomba - great concept, but...

I love the Roomba. But it appears that instead of eliminating labor as it promises, it merely redirects it. Instead of vacuuming, you spend time (admittedly less) repairing it. I have two. The second one, model Roomba 4150, had a ground down spur gear or drive gear. This prevents the vacuum beater and sweeper (Quidditch, anyone) from actually rotating, with the added side benefit of some really loud grinding noise. Replacement gears are about $30. Repairs are executable (I had it apart and back together to find the problem). Now just need to decide if it is worth the money. Right now, I'm voting not.

First Blog Post!!!

Okay, so I'm only... well I don't really know how late I am into this whole blogging thing, but I've decided that I'm going to start detailing my repairs / gadgets / computer stuff on line so it is easily accessible. Gotta love the cloud, baby... as long as you don't put any secrets there!!!